Auto Wicking Molds
How to wick pillar molds
Published on
August 7, 2023 at 8:38:00 AM PDT August 7, 2023 at 8:38:00 AM PDTth, August 7, 2023 at 8:38:00 AM PDT
Pillar candles are having a huge moment right now! They come in so many different designs, styles, shapes and sizes really allowing you to get creative! Pillar candles however can be tricky and frustrating to wick everytime you pour. Auto wicking your pillar molds makes pouring pillars less of a headache and saves time!
WATCH US AUTO WICK HERE…
What is auto wicking? Auto wicking is wicking your mold so you can just pull through the wick each time instead of having to wick each mold individually.
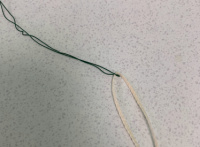
Step 1 - Take floral wire and cut about an 8 inch piece off then fold in half to make a loop.

Step 2 - Take your wicking that is still on the roll and place the end through the floral wire loop.
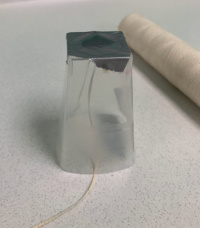
Step 3 - Thread the floral wire with wicking through the bottom of your mold and out the top. Your mold is officially auto wicked!

Step 4 - On plastic and metal molds take mold seal and cover the bottom area where the hole is so no wax leaks out. Take a piece of duct tape and cover the bottom getting any air bubbles out. The bottom should lay flat so your candle does not tip over while pouring. If you have a silicon mold use a large need to thread the wicking through since they mold are pouress they reseal once the wick is through. If poked too much they will start to leak. You will not need mold seal but can use duct tape just to ensure no leaking, if desired.
Step 5 - Secure the top part of the wick with a wick bar so it stays straight and tight while pouring.

Step 6 - Pour your candle and let it cool. Once cool, release the mold and pull the candle through. Trim off the extra wick both top and bottom. And reset the mold for your next pour!
