How to Make Stunning Flower Candles: A Beginners Guide
How to make flower candles
Published on
March 5, 2024 at 9:25:15 AM PST March 5, 2024 at 9:25:15 AM PSTth, March 5, 2024 at 9:25:15 AM PST
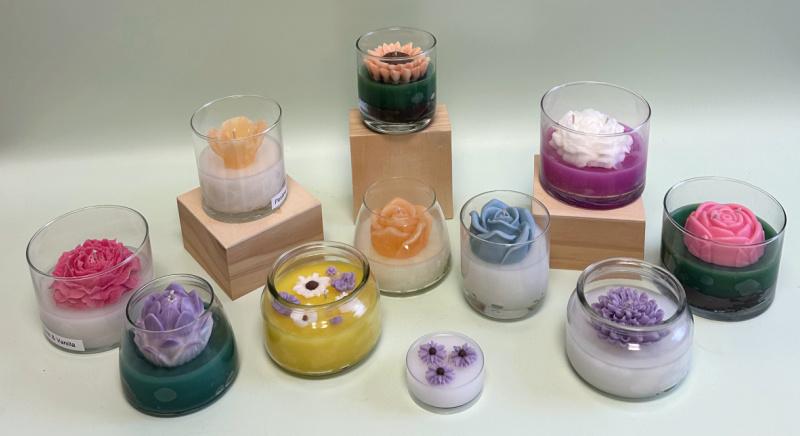
Flower candles are not just trendy; they're a delightful addition to any space, bringing the charm of spring indoors. Creating your own flower candles is a rewarding and straightforward process, perfect for beginners eager to dive into the world of candle making. Follow these step-by-step instructions to craft your own floral masterpieces that will add a touch of warmth to any room.
Skill Level: Easy
Duration: 45 minutes (excluding drying time)
Makes: As many as you desire!
We'll break down the process into manageable sections to make it easy to follow and maximize efficiency. Feel free to adapt the process to suit your preferences and enjoy the creative journey!
Supplies Needed for the Flowers:
- - Silicone Flower Molds
- - Mold Release Spray
- - Votive size wick pin
- - Votive/Pillar Wax with a melting point of 135 °F or above (our recommended waxes are Hybrid Votive Pillar Blend 1285, Advanced Soy Pillar,Palm Feather Blend, Production Votive Blend, Production Pillar Blend and IGI 4625) You may notice some waxes work better than other for certain molds, it is a bit of what your preferences are and try & error. Remember the nice thing about wax is you can always remelt it!
- - Candle Coloring (Liquid or Diamond Dyes). We like liquid here because some of the embeds are so small you won’t be making huge batches so liquid is easier to use in small portions.
- - Fragrance Oil (Floral Fragrances are the best for these candles!)
Supplies Needed for the Containers:
- - Jars or Vessels
- - Container Candle Wax
- - Pre-tabbed Wicks
- - Wick Tape & Straw
- - Wick Bar
- - Burning Instruction Labels
Equipment Needed:
- - Heat source to melt the wax
- - Metal spoons for stirring and color testing
- - Heat gun
- - Pouring Pitcher
- - Drill with a 1/8 inch bit
SHOP INGREDIENTS AND EQUIPMENT HERE…
Instructions
Building Your Flower Stock:
To streamline the process, start by creating a stock of wax flowers. This allows you to mix and match flowers without making a new one for each candle.
- 1. Spray your flower mold generously with mold release spray.
- 2. Prepare your wax: Melt your wax to 200 °F and add your color and fragrance oil desired. (Tip: search images on google by flower type to gain some inspiration on flower colors and combinations)
- 3. Pour the wax into the flower mold and let cool.
- 4. Gently remove the flower from the mold when completely cool. Molds with a lot of detail work best with a higher meltpoint and more flexible wax like paraffin. Soy and soy blends do not work well in detailed molds with delicate petals like the peony.
- 5. Repeat this process until you have all the flowers you want to use!


Creating a Wick Hole in the Flower:
There are two easy methods to create a wick hole, depending on the type of flower one might work better than the other.
- - Insert a wick pin when the wax is set up but not completely solid. Remove when wax has cooled completely. This creates a hole through the flower so that you can insert your pre-tabbed wick later.
- - Another method is to allow your flower to cool in the mold and remove. Then use a drill with a 1/8 inch drillbit to make a wick hole for your candles. (Tip: It helps if you heat the drillbit with the heat gun so that the flowers don’t break. Go slowly!)


Let’s Make the Candles!
Now, let's bring your creations together to make charming flower candles.
- 1. Heat your container wax to the recommended temperature.
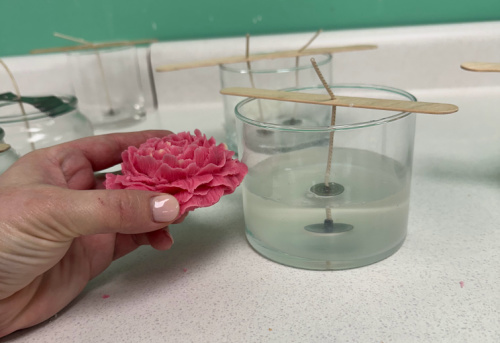
- 2. While the wax is heating, place the flower that you already made in your jar to determine your pour height. You can use a Post-it note or paper clip on the outside of the jar as a guide where you need to pour the wax to in your vessel. Remember to leave enough room for a lid if you’re going to use one. If the flower sticks out too much it runs the risk of melting outside the jar.
- 3. While the wax is heating. Prepare your jars.
- - Put the burn label on the bottom of the jar
- - Use a straw wick tape to insert your pre-tabbed wick
- - Stabilize the top of the wick with a wick bar

- 4. Add desired color and fragrance oil to your wax and pour your wax to the desired height.
- 5. Let the candle cool and remove the wick bar
- 6. Use a heat gun to melt some surface wax on the candle's top, then gently slide the pre-made flower over the wick to the candle's top. The melted wax will secure the flower in place.
- 7. Trim your wick, and viola, a beautiful flower candle ready to illuminate any space!
Enjoy the process of creating these beautiful flower candles, perfect for bringing a touch of springtime bliss into your home!